
Logitech G930 Battery Upgrade
To start
I love my G930 wireless headset. It works fantastic, once the popping from the virtual surround sound was fixed in one of the Logitech Driver updates. If the latest Logitech software is giving issue, you can always revert to a known good driver version (Logitech Gaming Software 8.45.) The only issue I have with mine, now that the headsets have been in use for 7 years, is the battery life. I used to be able to charge the headset and wear it without wires for several days of play if I turned it off between sessions. Now though, the battery only last for a few hours before I have to plug it back in.
I did a bit of digging and discovered that the headset runs off a single 600mAH Li Ion battery. This battery was claimed to have a run time of 10 hours, that was a fairly accurate estimate.
Math word problems incoming. I found this wonderful page for electric vehicles describing battery capacity degradation which showed number of charges and how far the battery discharged before charging, and correlated that information with the remaining charge in the battery, this site seems to use newer batteries as the average charge cycles to 80% are thrice the normal consensus of 500 cycles.
there are roughly 2550 days in 7 years and as an avid gamer I estimate that I used my headset to full depth of discharge 5/7 days of the week and 50% depth of discharge the other two day. This makes 6 full charge cycles per week of use. So to figure the rough number of total charges cycles I have used we will take
2550/7 = 364 = number of weeks we just need to subtract this from the total days, since we are only at 1 day of no charge cycle. 2550-364 = 2186 = number of full charge cycles if I did this every day for the last 7 years. Since that is unlikely I will drop another full day of of each week to account for days I didn't have time to play. 2186-364 = 1822 = rough estimate of number of charge cycles my headset has gone through.

Blue line drawn by me
According to the newer chart the battery would reach 80% at 1536 full discharges and that at my current charge count of 1822 I will be sitting roughly at 75% capacity. That doesn't seem right and since I know this is an older battery I am giving it a generous 800 cycles before hitting 80%, using a rough visual I traced an additional line to the graph provided from the electricvehiclewiki.com/Battery_Capacity_Loss article and that puts my current capacity at roughly 58%
We also need to account for general loss of capacity due to aging of the battery. This article(http://jes.ecsdl.org/content/163/9/A1872.full) on calendar aging of batteries says that the typical Li Ion battery will lose 0.2% capacity per month of storage at 25C or 77F, which is higher than my storage areas sit at so I will lower that loss by a small fraction to 0.175 loss per month. 2550 days equals roughly 85 months and at 0.175% we lose another 15% capacity on the battery putting it at 43% capacity.
That estimate is actually a little generous at 4.3 hours of battery life. In practice I would put that capacity closer to 3.5 hours or 35% of capacity remaining.
I would say that is well overdue for a replacement.
Battery replacement
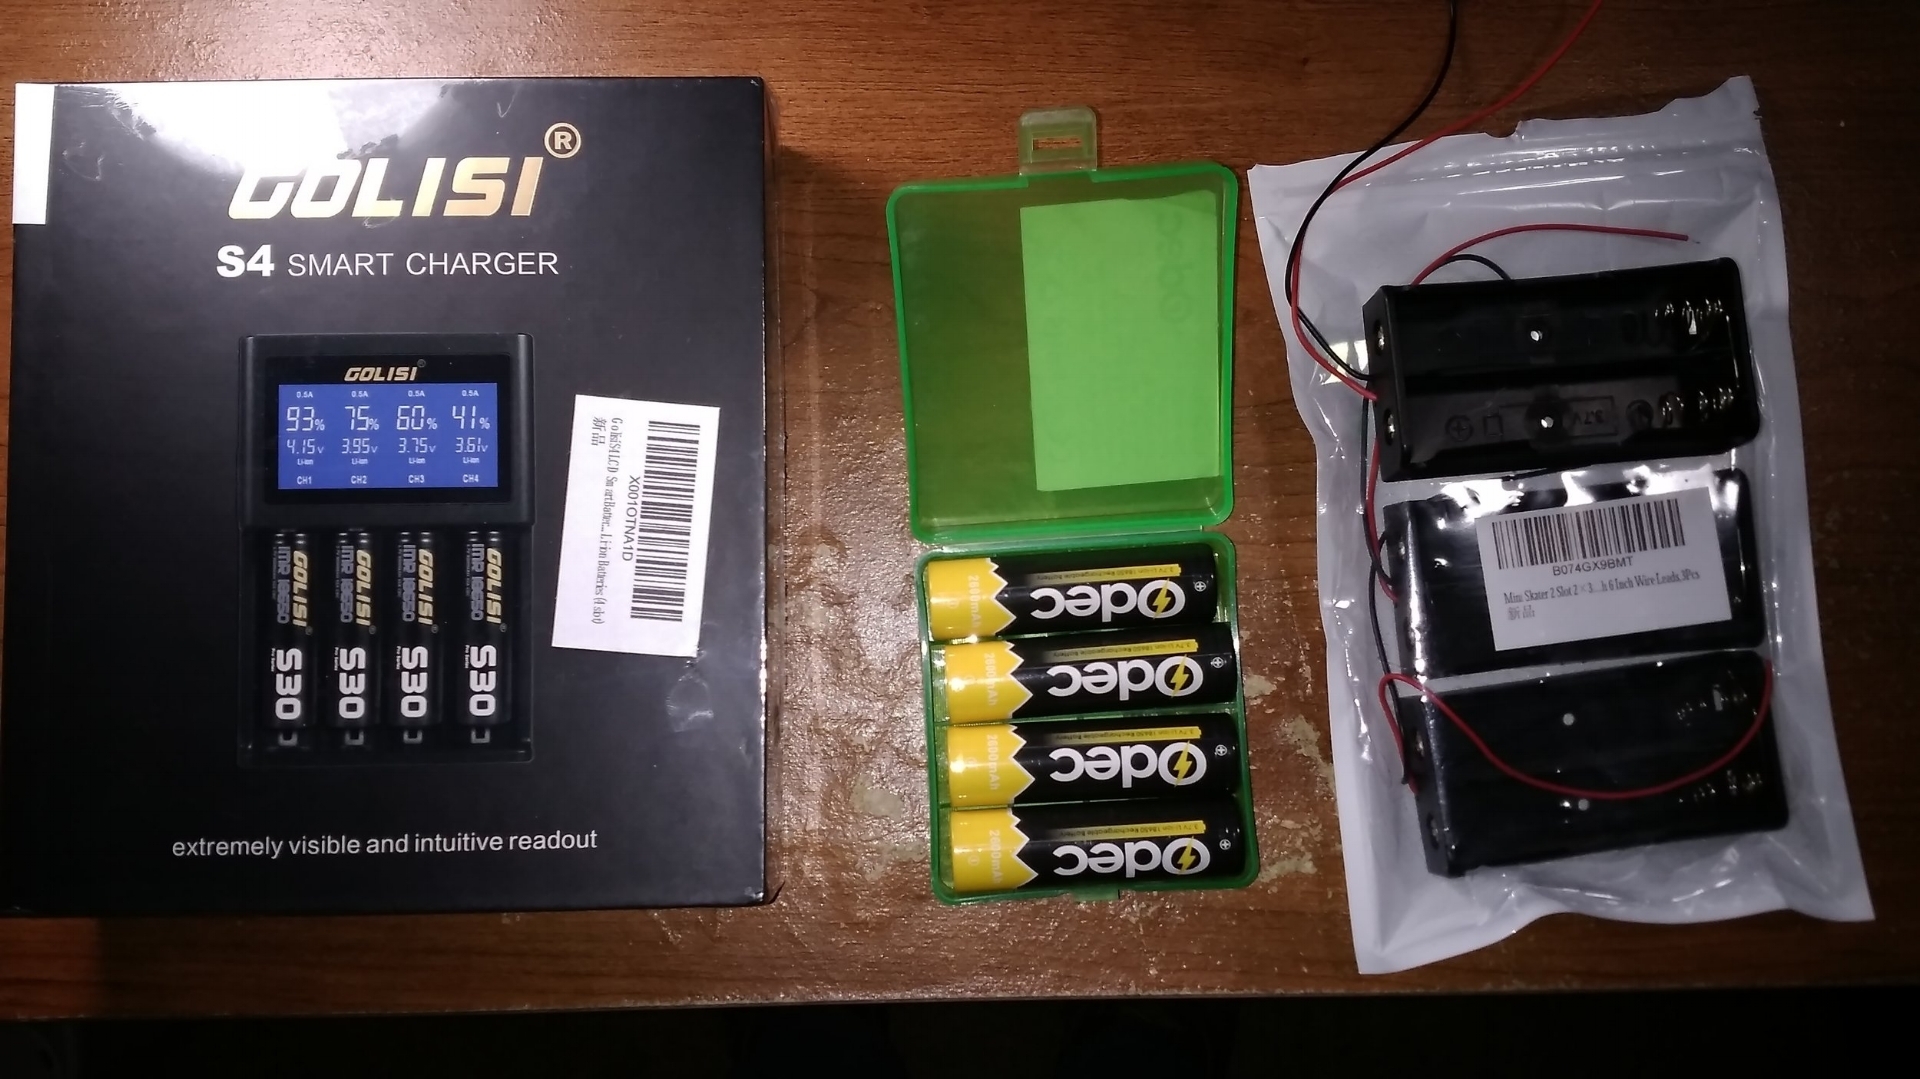
Golisi S4 Charger, 4 Odec 18650 2600mAH Cells, and 3 2 bay 18650 housing cases.
Logitech no longer provides a spare battery for this headset and that is understandable, this thing is old. You can however still find a suitable replacement on Amazon that fits. However, that is the most boring way to bring new life into this old headset. Since all other parts are working just find, I want to upgrade this headset to a much larger capacity "battery"
I found a few people that have already done this project and there are quite a few ways that we can accomplish this. Since I am constantly using my headset I want a method that allows me to stay wireless for the longest duration possible. At 600mAH per 10 hours of use, and knowing myself and leaving the headset on all the time, I want to extend that capacity greatly. Also I dislike having to charge my headset while I am using it, so I want the battery to be easily replaceable.
I could get an internal battery with a large capacity allowing several days worth of charge, but that doesn't satisfy the criteria for easily replaceable. What does check all those boxes are 18650s, They come in varying capacities and their standardized sizing allows for a housing that can be installed. This is the method I chose to go with.
Choosing the capacity
18650s are relatively cheap, but I really want the cost of this upgrade to be less than the cost of replacing the headset entirely. A quick search of Amazon show that the average cost of a headset is around $125. I don't really want to spend that much either. I am shooting for closer to $50 to upgrade this headset. For that cost I could get a decent wired headset which is what I have currently with the battery in the state it is in.
The G930 battery is rated at 3.7V, so to avoid burning out the device I need to supply the same voltage. 18650s come in varying voltages ranging from 3.3 to 4.2 volts. This is the same for all Li Ion, but to play on the safe side I will get ones that specifically say they are rated at 3.7V.
Now that I have the voltage I can narrow my search for capacity. I want to choose a battery that has good reviews as there is a fair amount of these products that are made cheaply and do not offer what is specified on the product listing. I ended up choosing this Odec 2600mAH 4Pack at $20. It had plenty of reviews saying that what was described is what they received and it has a hefty 2600mAH rating.
(Edit: After going back through and verifying my links, it seems that the Odec 2600mAH pack is no longer available on Amazon. Doing a quick search I found some others that should get the job done but your mileage may vary. Just be sure to check the reviews and pick a product that you are comfortable with purchasing. DO NOT take my word as gospel on these. Many of these are manufactured overseas and some have been known to have poor quality or not be what they say they are.
Other parts necessary
So I now have my batteries chosen, I will need a housing for them to sit in the headset. The battery in the headset uses a mini molex type connector to connect the battery to the headset. Looking around I couldn't really find any housings that use that same connector, so instead I chose a cheap housing pack for $6 that I can also use for other projects if needed.
Also needing a way to charge the 18650s and this is the part I do not want to skimp drastically on. The most important parts are the 18650s and the charger. If you get a cheap charger then you lose certain features that keep you safe, as well as quality of life features. For the charger I chose this Golisi 4 Bay charger that fits various sizes of Li Ion cylinder style batteries.
The actual replacement
First we need to remove the battery. This is accomplished by removing the case of the battery which is held in by screws underneath the ear pads. The pad is just held in place by an elastic type pad. To remove the pad just pull one corner until it moves over the lip of the earpiece. Word of advice, the battery is housed under the side without the microphone, I know this is counter intuitive since the headset charges from the side with the microphone.

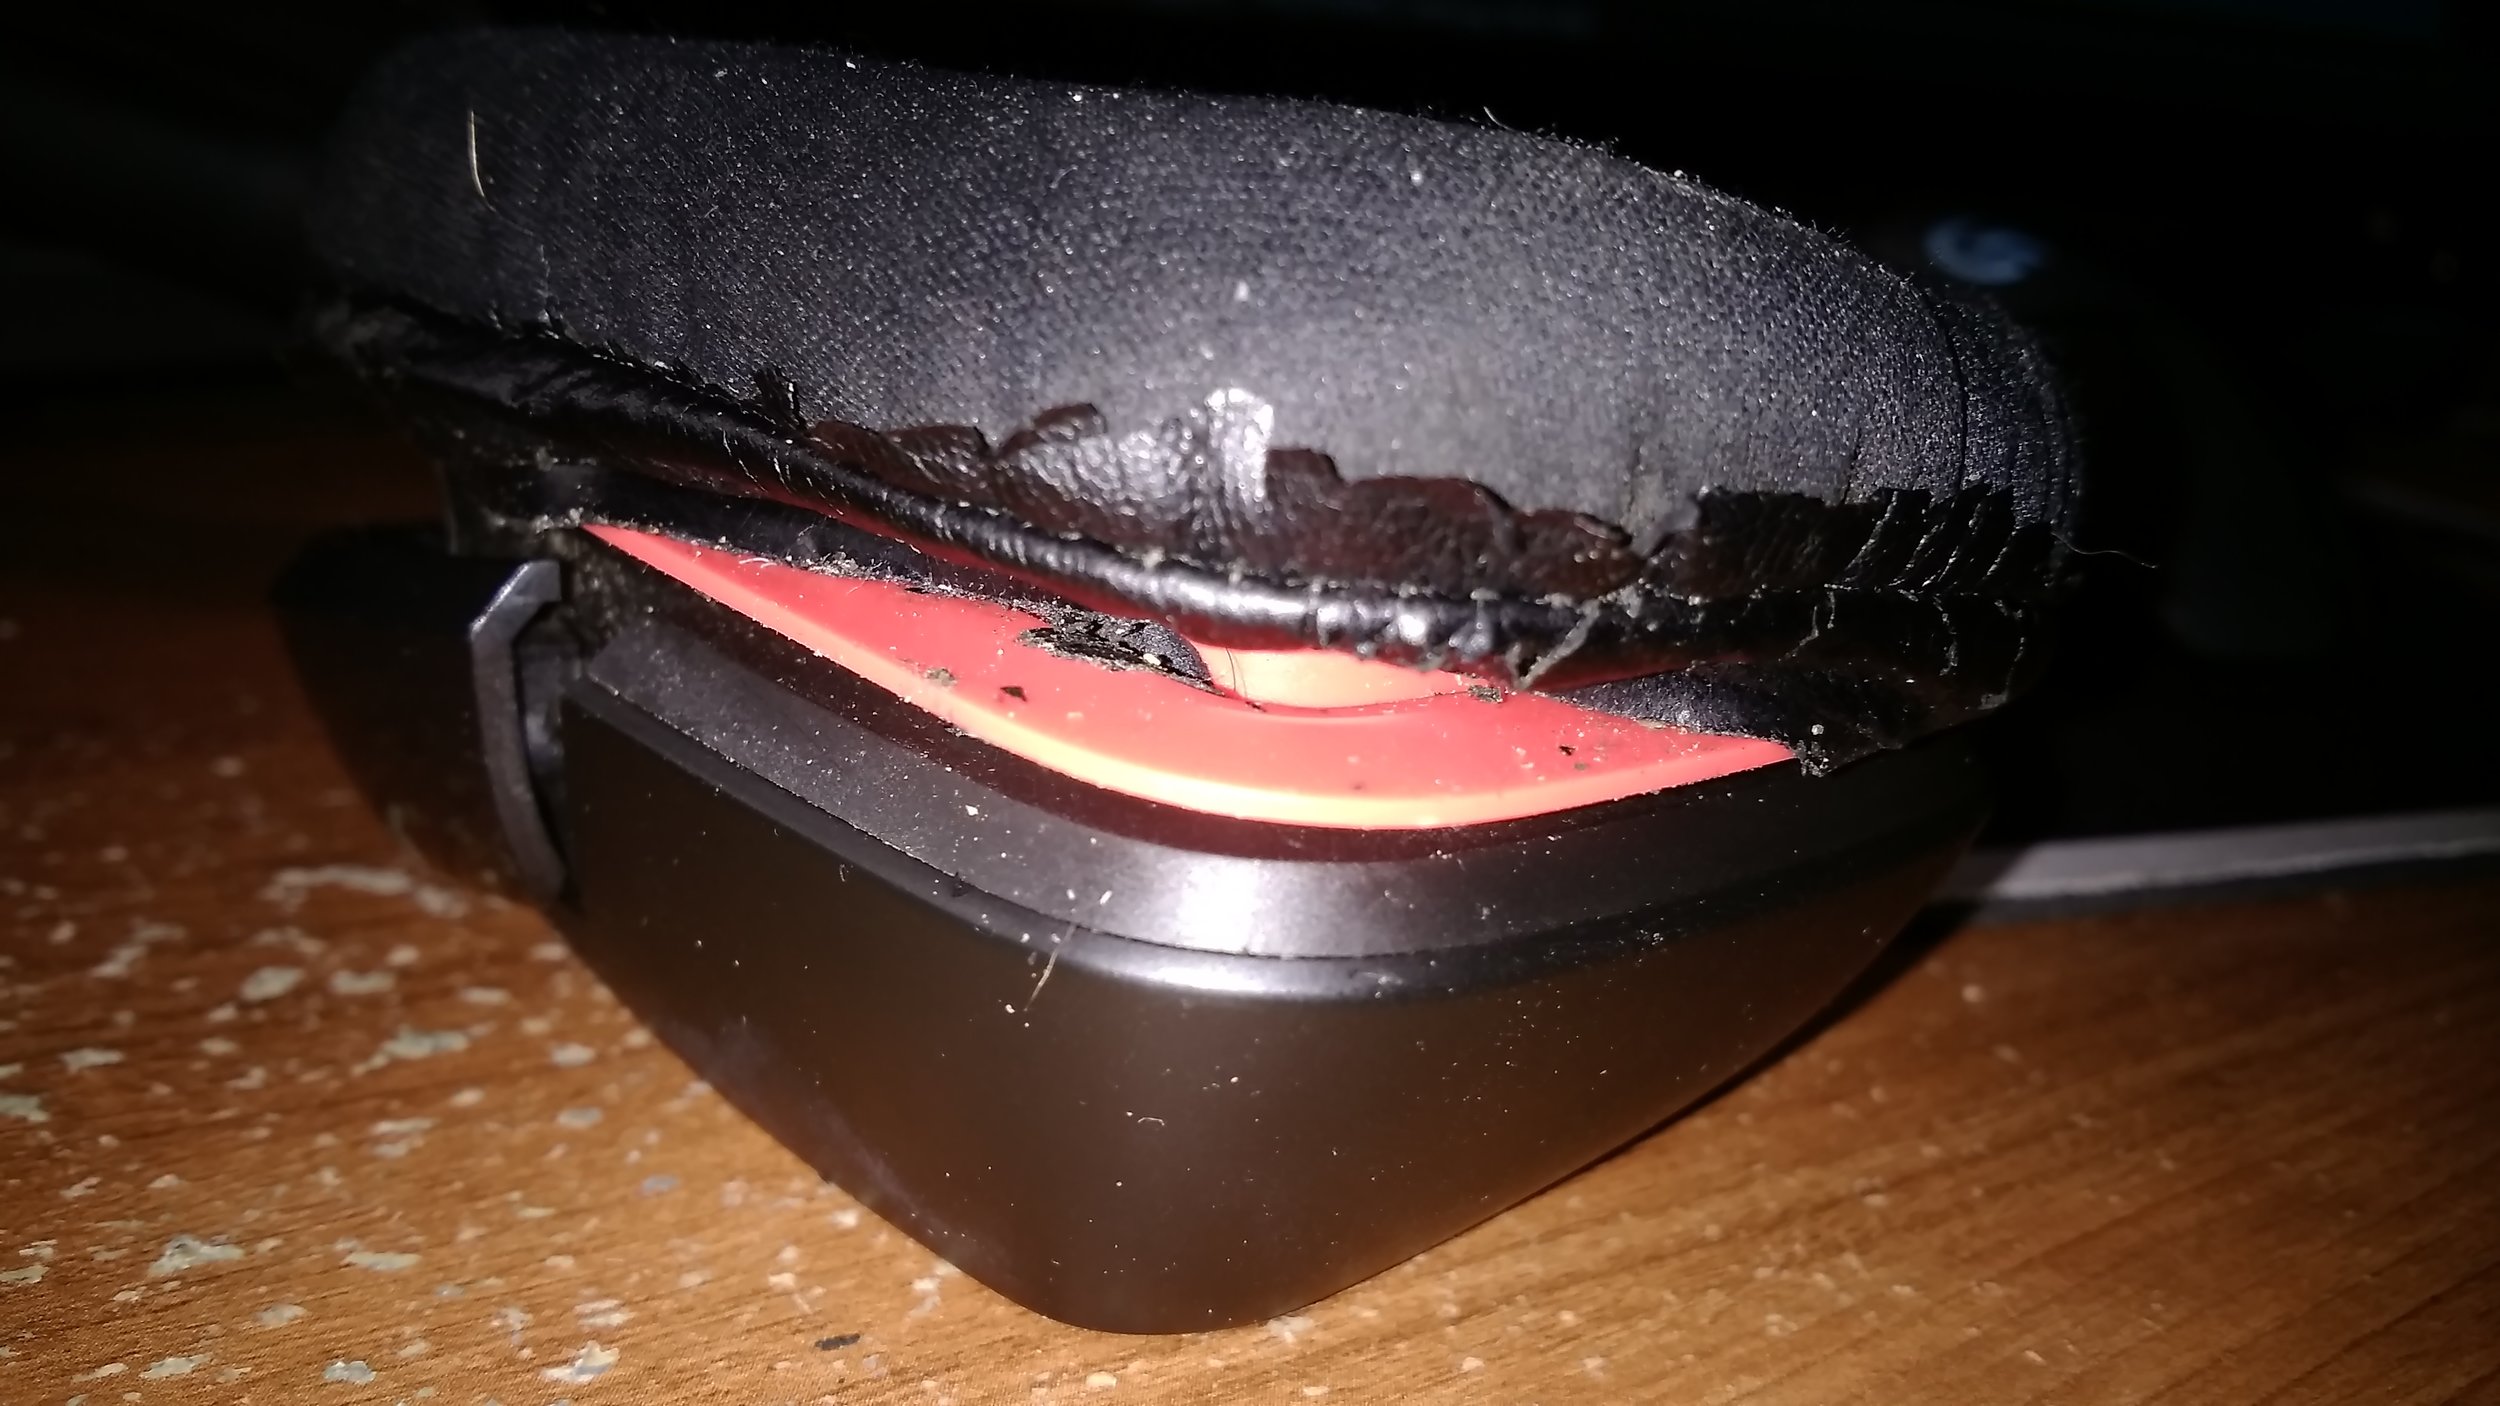
Now that we can remove the earpiece, we need to clean the inside up a bit as it gets pretty dirty from normal use. There a re a lot of little nooks and crannies for stuff to get stuck in. what you have left should look like this, hopefully a little cleaner. You can see the five screws you need to remove to get the battery here.
![IMG_20180506_163040[1].jpg](https://images.squarespace-cdn.com/content/v1/5acd81c9aa49a1426932f43a/1525642273207-4HTP9LZSGGS2ON7RUK31/IMG_20180506_163040%5B1%5D.jpg)
There are five more screws to remove here.

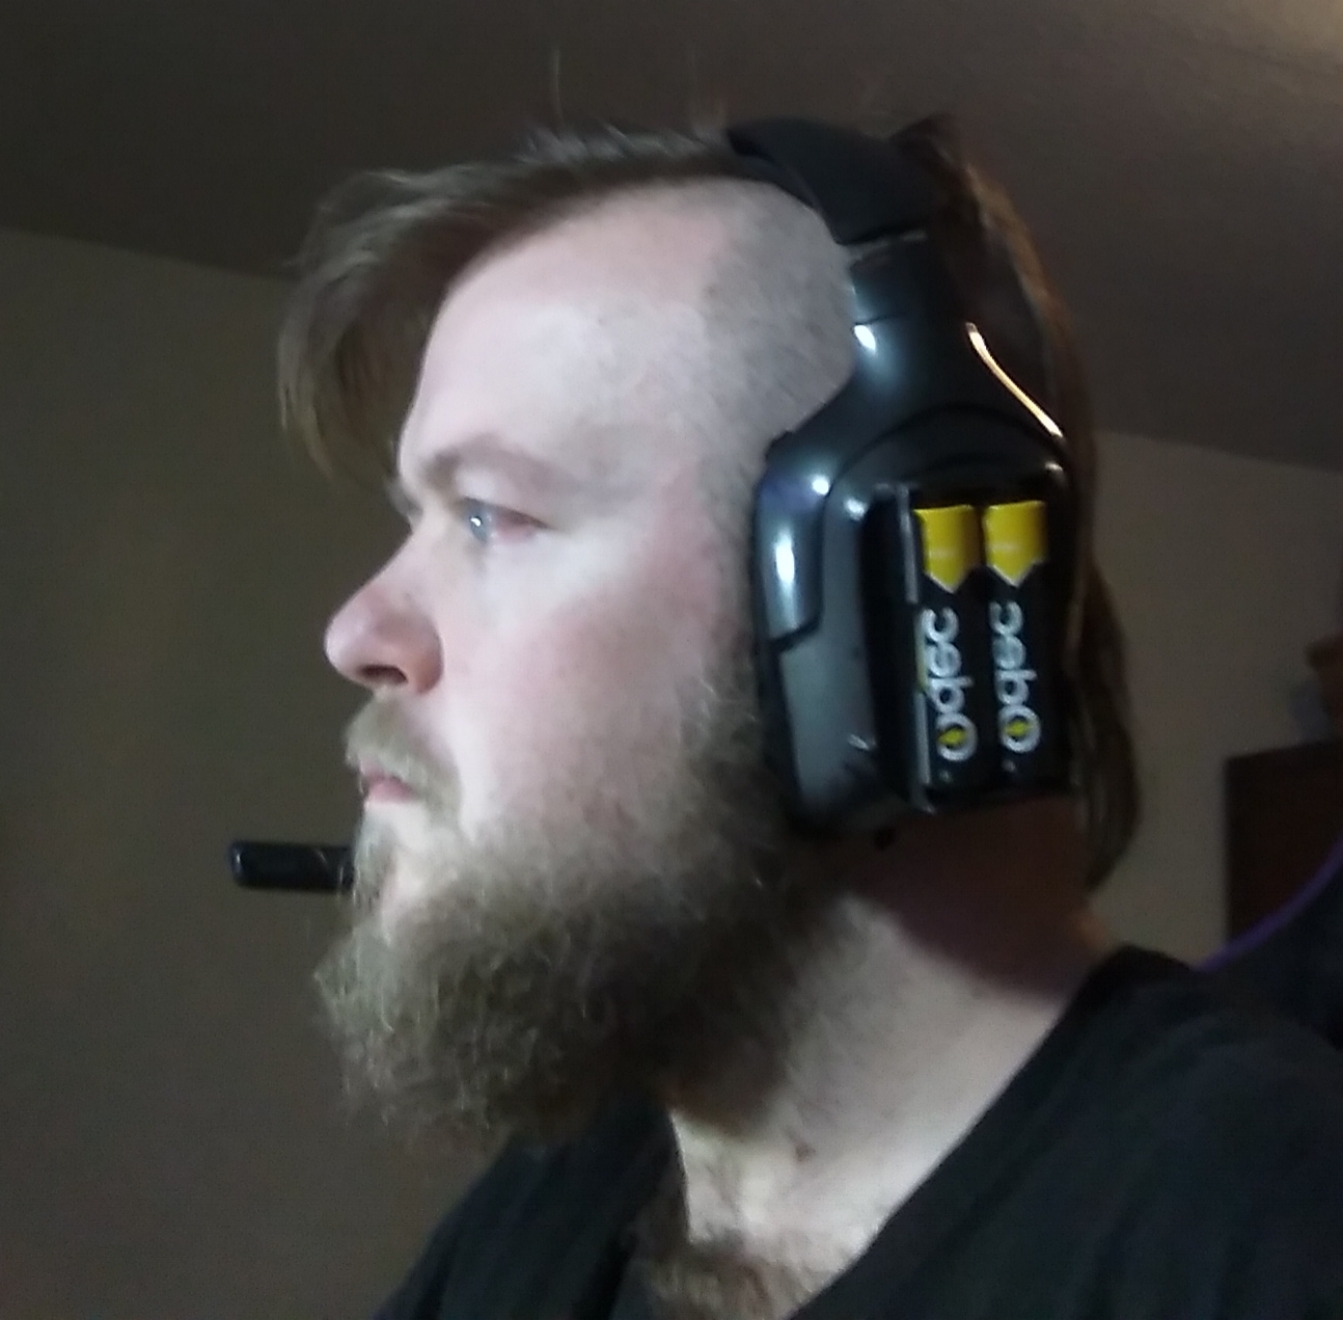
Now that the second set of five screws are removed, we want to flip the headset over and the back cover pops off, revealing the Logitech battery. Being me, I took a flat-head and pried open the battery to see how it looked on the inside. It looks fairly simple, with a positive terminal, a negative terminal and a sensor wire. I do believe that I could take this sensor board and attach my new battery device to it. To remove the board I an NOT going to use my soldering iron as I feel it is too close to the battery and I would like to not short the battery if I can. However I should have some snips around here somewhere.

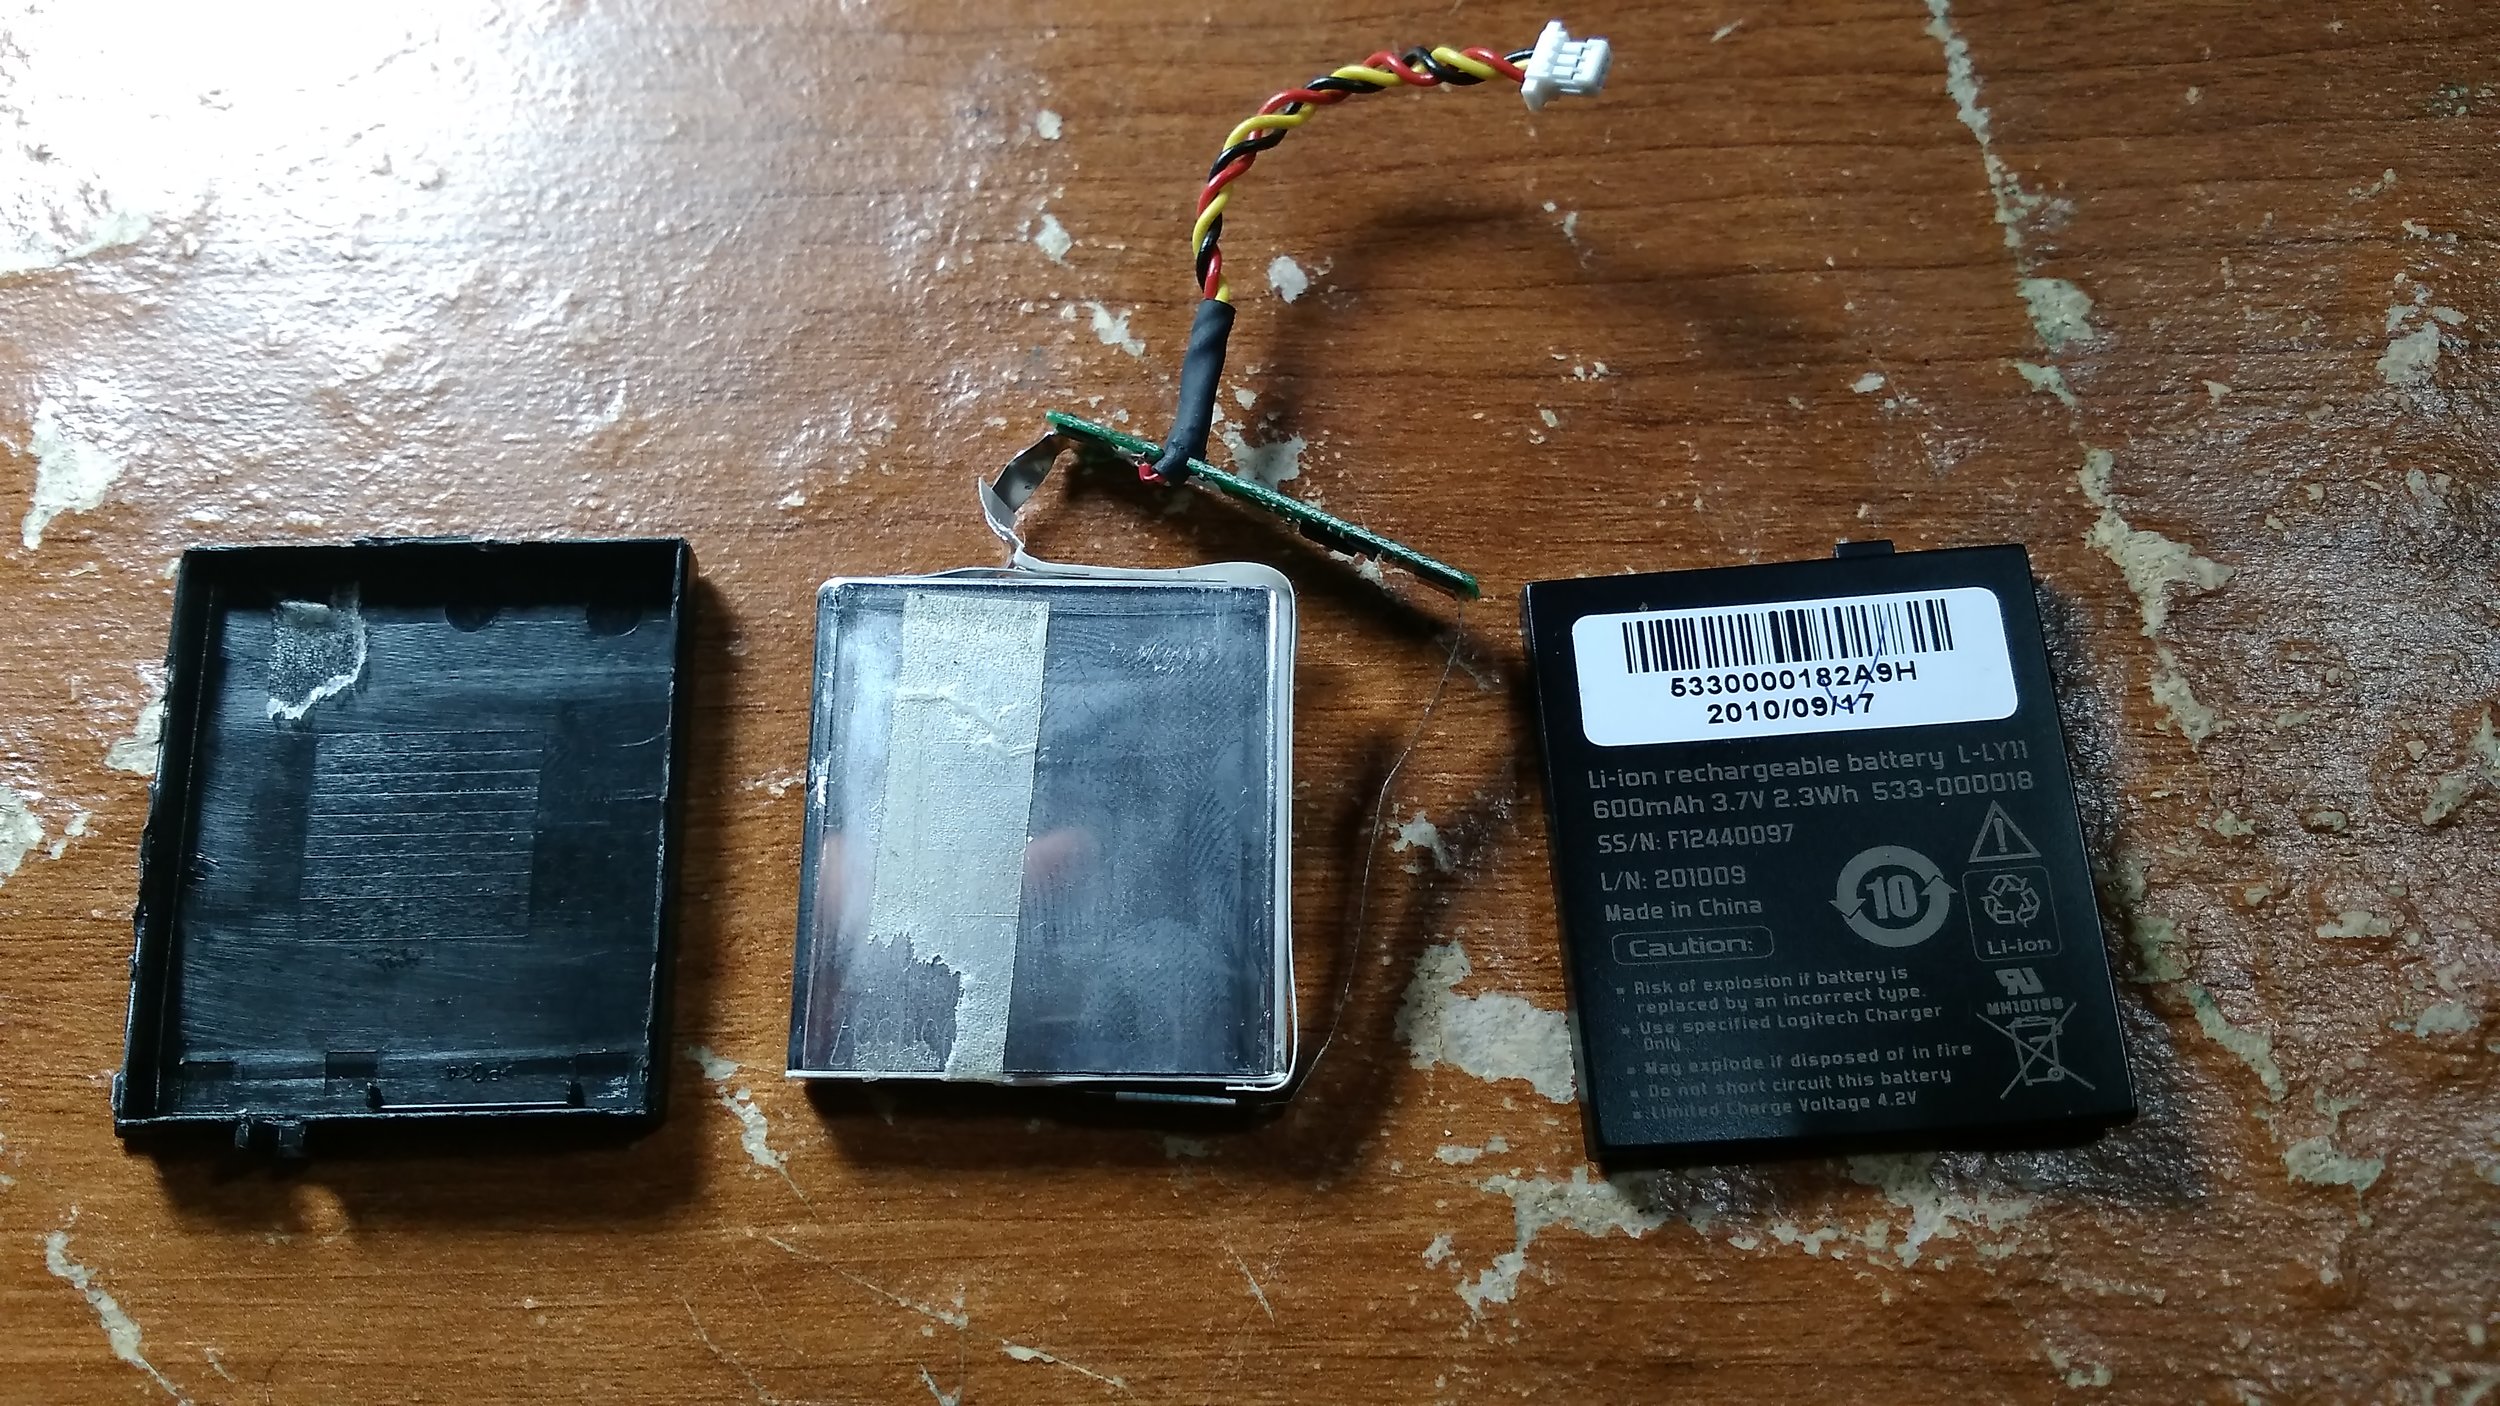

Looking at the PCB there are not markings designating positive and negative, the same can be said about the Battery that was attached to it. I will need to test which connector is the correct connectors.
I grabbed my trusty dusty multi-meter and the battery that I so inconveniently disconnected. Set them up the way they were connected and tested the battery for polarity. As you can see the positive is connected to the positive and negative to negative. Now I just need to correlate with the PCB and you can clearly see the connector closest to the wires is the positive terminal and the connector farthest from the wire is the negative terminal. Now I can solder the board to the 18650 housing.

With my awful, awful soldering skills, I now have a housing connected to the original board that came with my headset. Some quick cable management with electrical tape and it looks pretty decent.

Now to put the whole thing back together. Looking at the headset and the case, It appears that I could put my batteries back in and close it up, but that is not the intention here. I want this to be easily changeable so that I have as little time charging as possible. What I could do, is close it up and then only have to charge my headset every 86 hours, which is pretty cool, but I would like to not charge at all and it is the whole reason I grabbed a charger as well as a 4 pack of batteries. So I can charge the extra batteries while I use the headset, and then when it is done, change out just the batteries and keep going. It removes an unwanted cable from my desk that has been a pain in the ass since I got the headset.
So instead of closing this up, I am going to cut myself a hole in the side of the outer-case to allow access to the housing.
I got excited during the making and forgot to take pictures of the hole cutting and epoxy of the housing, but the finished part i got. Yeah, I used the whole tube of epoxy on this.


Unfortunately, as it turns out, in my haste to complete this, I did not measure the depth of the casing correctly. I have now epoxied the piece and it sticks out just a bit. It is being held together by a single screw while I look to get longer screws to reach.
I have screws on order, and while I wait I am putting the thing together.
Fun bit, It doesn't work. I am thinking it is the board that was too good to be true. I am now wiring it up the old fashioned way of just connecting the wires.
As it turns out, test your shit before you make anything permanent. The ground wire on the brand new housing unit was bad. So now I need to remove the housing that's epoxied in and start from scratch.
Next Day
So removing the epoxy was not as bad as I expected. Using my 3/32 flat head screw driver in ways that it is not intended to be used did wonders. I was careful to be as controlled as possible when using it, but I figured it was safer than trying to remove the epoxy with my Exacto. BONUS: now I can take a picture of the case with the hole in it.
As you can see I removed the board from the equation and I have already tested the connection before solidifying the housing to the case. Another bonus is that I can situate the housing to fit with case and not sit too far in causing that 1/2" gap that I had before. Just don't judge the 30 minutes i spent getting that hole cut with my rotary tool.


I played it smart this time and attached the housing to the case before epoxy and put it all together. I lived the sides with electrical tape to hold the housing in place while I set the epoxy and also to act as a barrier so I won't need the whole tube this time, since last time all it did was drip down through the sides, wasting most of the epoxy. Well, to be fair I wasted all of the epoxy since I didn't test first and had to dismantle what I thought was a good job. But look at how pretty this looks without being set.

The epoxy is almost set and I have finished cleaning up the little bit that bled through covering one of the connectors. It was just a matter of waiting for the epoxy to set a little bit and then it was fairly easy to scrape the residue off.
I have tested it again and put it back together, and I must say it looks pretty good. All in all I'm pretty happy with the outcome.
Total cost of upgrade: $62
4x Batteries - $20
1 Charger - $24
3 housings - $6
2 sets of epoxy - $12
Things gained from the upgrade:
Increase in capacity of current: 2000%
Increase in capacity over new out of box: 860%
Total estimated hours of run time: 86
Time needed to charge: none, just swap batteries.


The Review
It’s been a while since I have made the modification to my G930s and I wanted to come back put my thoughts down on how they are performing. The headset just keeps on trucking and it’s still a decent headset. I continue to get on average 4 days of run time out of the headset. There was some headaches with the Logitech software profile that I had to deal with to get them to be not annoying.
The headset was still being registered in the Logitech Gaming Software as having the original battery capacity. This became annoying rather quickly as the software profile for it had the capacity at 600 minutes, or 10 hours, the run time of the original battery. At about 80% the LGS would signal the headset to sound the battery low chime, which would go off every 5-10 minutes or so, I forget how long since I’ve long fixed the issue and it’s no longer fresh on my brain. This wouldn’t do, there is no way I was going to live with a chime every few minutes for the next 70+ hours. I needed to figure out what to change to make this not be annoying.
Digging
After some long searches and digging through all the files that comes with the Logitech Software, I found a settings.json file buried in the “AppData/Local/Logitech/Logitech Gaming Software” folder. Inside this json file was a host of things you can change that is not available inside the LGS itself. The section of particular importance for us is :
"notification" :
  {
    "battery" :
    {
      "Logitech.Gaming.Headset.G930" :
      {
        "Critical" : 1570175825,
        "Low" : 1570166465
      }
    },
    "lowBattAudibleWarning" : true,
    "showDPIChangeOnLCD" : true
  },
This block of code took me hours of digging to find. And it doesn’t do anything. It looked to be important, but really all it is, is a json file of what the software reads out when the headset first reports. It appears that the Critical and Low “settings” can be modified at first glance, but they are just Epoch timestamps for when to play the chime that the battery is low. The lowBattAudibleWarning is also not set in here, this is just a printout for the software to read.
Some more digging
After parsing through everything and coming back to the problem after having some time away from it, I found this little tidbit of a line within the Manifest file for the G930 headset. The file is located in “C:\Program Files\Logitech Gaming Software\Resources\G930\Manifest”
<battery turnOffInterval="900" lowBattTime="250000" pollInterval="120" lowBattInformInterval="250000"/>Now that’s more like it. Modifying this file actually made things happen. The turnOffInterval is the time in seconds the headset will turn off after no activity, this is nice if you never want them to turn off, set it to 0, or whatever setting your heart desires. The last three are very important. The file originally has the lowBattTime to 3600 and the lowBattInformInterval to something lower than that, I forget, forgive me, it’s been a year since I did this, but I wanna say it was something like 300. So originally low battery would ping at 1 hour left and then ping again every 5 minutes. Which would have been fine except it would ping after a few hours and then never stop. It now pings immediately upon stating the headset for some reason, likely that it doesn’t register that high of a low battery time, and then doesn’t ping again for 69 hours. I might fiddle some more with the lowBattTime to see if it changes when I first get the chime, or I might leave it.
Back to the Review
Once I fixed the issue with the chiming I have been extremely happy with the extended life of my headset. I am having a hard time justifying dropping cash on a new headset for my gaming rig as they keep getting more and more expensive and this $100 headset from 8 years ago is still just as good as it was the day I purchased it. Is it a little worse for the wear having been working for that long, sure, but it still sounds just as good as it did on day 1 and all the features are still working. It is a little heftier on the right side, but it hasn’t affected the ability to wear it for extended gaming sessions and they don’t try to fall off unless I get really excited.
All in all this has been a great mod to a headset that has served well. I would recommend everyone who is getting tired of battery life in a G930 perform this mod if you are comfortable running the risk of destroying your set.